Alec Illustration
Showing posts with label Animation. Show all posts

November 9, 2020

Animating My Way Through the Pandemic

@AlecAnimation
One of the main ways I have been coping with the stress of the pandemic has been delving deeper into my interest in hand-drawn animation. I set up a new instagram account ( @AlecAnimation ) where I have been posting animation projects old and new, as well as posts about various animation resources. It feels like a new easy way to document my self-study of this art form. I currently have no desire to work as an animator, so it's all "just for fun" though many of the skills I am building up have also helped me level up as a cartoonist. This all kicked off back when I had the realization that two of my favorite cartoonists (Carl Barks and Jeff Smith) started their careers in animation and maybe it would help me to be a better cartoonist if I underwent some animation training too.
My animation journey began at the ripe old age of 32. I had been fascinated by animation my entire life, but it was not until 2012 that I finally picked up a pencil to try my hand at it. You can actually see my very first attempt at animation cataloged on this blog, as well as early experiments I drew using exercises I cobbled together from Richard Williams's excellent book The Animator's Survival Kit.

Over the next five years I read Disney Animation The Illusion of Life by Frank Thomas and Ollie Johnston (which I spent my whole childhood flipping through, but never actually read) and Cartoon Animation by Preston Blair. As a cartoonist I had always assumed animation simply meant more drawings for less storytelling output, but I quickly learned it is so much more than that. It's a whole different way of thinking and seeing. You make a leap into the fourth dimension - not just depicting static characters, or a sequence of images, but the actual movement of a character or scene. There is nothing quite like the magic of watching one of your drawings come to life for the first time!

In 2014 the Belgian comics publisher L'employé du Moi asked all of its authors to animate a short walk cycle in the "shape" of its logo for an exhibit at the Angoulême International Comics Festival. I chose my character Argus (from my graphic novel Basewood). You can see my process posts on this blog: Part 1 - Part 2 - Part 3 - Part 4 - Part 5. Then in 2015, I created an animated holiday e-Card for The Harry Potter Alliance (there's a process post here). With both of these projects I learned so much, and also had a ton of fun. It lead me further and further down the animation rabbit hole.

After a decade of teaching the same comics workshops every summer at The Center for Cartoon Studies, I was burned out, so in 2017 I pitched the idea of teaching an animation workshop instead. I've taught it every summer since and it has been so wonderful to have an "official" place to share my enthusiasm for this art form, and all the different ways it has influenced my cartooning practice. It also gave me an excuse to continue learning as much as I can about animation!


Because of the pandemic, last summer's workshop was held 100% online, with the students creating all of their work using RoughAnimator (an amazingly powerful piece of animation software for Mac and PC which only costs $5) and the SyncSketch platform for sharing work. It all went very smoothly, so I'm pleased to say that I will again be conducting my Introduction to Hand-Drawn Animation workshop online, this time during the CCS winter break, January 11-15. Classes are synchronous from 11am-5pm ET Monday through Friday. It is a very intense week where we cover the principles of animation, a simple walk cycle and a looping final project. You can see samples of past students' work and find more information on the workshop page!

There are needs-based scholarships, which all workshops students can apply for, as well as our standard 50% discount offered to all CCS alumni, current students and staff. 


This year we're also adding an exciting new merit-based scholarship to support professional development for BIPOC cartoonists. The application process is super simple (basically, submit a piece of your best work by December 1st) and then a committee of faculty and staff will review the work and award one full scholarship for each of the three Winter Workshops (there's also Digital Coloring for Comics and Graphic Memoir). Please help us spread the word about this awesome opportunity! 


When I turned 40 last year, I decided that animation was going to be my mid-life crisis. I bought more instructional animation books, as well as some new equipment (an "Acme" Hole Punch, a Wacom One Pen Tablet, etc.), and signed up for a bunch of online animation classes. As I began working on homework assignments and little projects here and there I became more and more obsessed with animation. 

When the pandemic hit, my day job became very stressful. I started animating every week on Friday nights after my kids went to sleep, for stress relief. Animation is so complicated that when I am working on it, I am unable to think about anything else. I put on some jazz music (I'm currently on an Oscar Peterson deep dive) and just get lost in the flow of animating. It is incredibly relaxing for me.


I set up my @AlecAnimation account on instagram, because it's a great platform for sharing small videos of my animations, as well as photos of the animation books I'm reading, websites I'm using to learn various skills, movies I'm watching, as well as other resources. I see it as a direct extension of my animation workshop, where people can follow along with my journey as I teach myself this amazing art form. 

I thought that posting new work every Friday would help me scratch the animation itch, but somehow it only triggered a frustration that I couldn't spend more time animating! All day, every day, I was thinking about animation, but because I was only able to work on it on Fridays, it was driving me crazy. After a lot of soul searching, I finally decided in October to begin animating every day (similar to my Draw Comics EVERY Day vow, which I have stuck to for the last twenty years). I managed to keep this up all through October, and it has been amazing how much easier it is to learn and improve when I do something every day, even if it's only for 15 minutes or so. I hope I can continue this practice moving forward!


One of the biggest challenges was shaking off my own stigma about working digitally. I prefer working on paper, but to make the best use of my limited time I decided it made more sense to work solely on the computer (mostly to cut down on time spent photographing/scanning drawings and having to compile them, though there are other advantages as well). 

I realized that I mentally catagorize time spent at my computer as "work" and time spent at my drawing table as "art." My wife Claire and I were already rearranging some furniture last month, and I was able to snag two small shelves which I used to build my own little digital animation work space. This tiny desk has made a huge difference for me. I can sit down and begin animating immediately without having to set anything up, and all my reference materials and text books are within easy reach. I'm starting to get the "art" feeling in front of the computer.

So I guess that's it. This is where I'll be sitting a little bit each day from now on, delving deeper and deeper into the animation art form, learning as much as I can, and sharing my journey with as many folks as I can through my workshop and instagram account. I hope some of you will join me!


March 4, 2019

Introduction to Hand-Drawn Animation Logo

This summer I will be teaching the Introduction to Hand-Drawn Animation workshop at The Center for Cartoon Studies in White River Junction, Vermont.  The class runs July 8-12 and is open to students 16 years and older.

I recently animated a new logo for the class, which seemed like a simple way to showcase some of the techniques and principles covered in the curriculum.  My hope is that potential students will watch this animated logo and go "That's what I want to be able to do!" and then come study with me in Vermont!  :)

Here is the finished logo, which loops every 24 seconds, and below you can see some steps of my process for putting this together:


The very first step was hand lettering all of the typography:


I then cleaned these up in the computer, and combined them with the CCS logo and the bouncing ball path, which I had on hand from a previous logo design.  I printed this out and then three-hole punched it on the top and bottom edges, to keep all of my animations registered to this design.


I decided to animate each section as its own "scene," starting with the little CCS person walking in and getting bonked on the head by the ball, which turns into the iconic speech balloon shape and makes them spill some ink.  I set up a 16-frame walk cycle that would loop three times to get the character across the screen.  Here's my thumbnail document to figure all of that out:


I animated this all on paper. Last year my old pal Nate Beaty gave me the idea of using stop motion animation software to create quick and easy pencil tests.  I downloaded Stop Motion Studio on my iPad and set it up on a tripod over a pegbar, like this:


I shot a couple of tests, made some corrections and then scanned in all my pencils for the little CCS person.  I then "inked" it in Photoshop, drawing on a wacom tablet, on a new layer directly over the pencils.  This worked well, because it allowed me to easily tweak small things, like the swaying brush end.  Here is an early pass (I later thickened up the ball path outlines):


Next up I did the "Animation" lettering, following the same process.  Here is a pencil test, before I inked it in Photoshop:
The last three "scenes" were all animated directly in the computer.  For the cursive "Introduction to" I simply saved a selection of the text and then filled in a bit more of the selection for each frame.  I decided to animate this on 1s (24 drawings per second) so that it would be really slow and smooth - it's how I write cursive, which takes a lot of concentration for me, and also kind of reflects the idea of an "introduction" to something - slow and steady.  It ended up being 287 frames, or a little under 12 seconds:


For "HAND-DRAWN" I wanted something really messy and organic to help emphasize that it was done by hand.  I followed a similar process of selecting the finished letterforms, and then I just did a series of straight ahead passes, improvising each frame with a series of squiggly lines that build and overlap and eventually fill in.  I wasn't 100% happy with how it turned out -- it would have been fun to also do this on 1s, where each squiggle actually moved along perfectly -- but by the end of 57 frames of this, I didn't have the energy left to take another crack at it!


I went through a lot of different ideas about how to loop the animation back to the beginning, but finally decided on a "circle wipe" using the center dividing line.  I did this all in Photoshop, just using Edit > Free Transform and then putting in a series of degree measurements that added up to 360 (making sure to ease in and out) for rotation.  I then painted white pixels very carefully into the scene while preserving transparency, to reveal or cover up parts of the scene as needed.  If you understand transparency in Photoshop, this will give you an idea of how that worked:


Once I had all these elements prepared as Photoshop documents with one frame on each layer, I brought them into Moho Pro and set everything up as its own individual switch layer. This allowed me to toggle on one layer at a time, which was essential because I was mixing animations that were both on 1s and 2s.  It also made it easy to position everything on the screen and on the timeline, to make sure things began and ended when I wanted them to.  Also with one click I could easily export .mov and .gif files. Here's what that looked like:


Anyway, I was pleased with the end result.  It didn't end up perfect (of course), but it was a lot of fun to put together, and I learned a couple of things along the way.  If this process looks fun to you, consider signing up for my Introduction to Hand-Drawn Animation class at CCS this summer!  It is going to be a ton of fun, and you can see some past student work on the workshop page.

January 23, 2019

CCS Illustrations - Part 3: One-Week Cartooning Workout GIFs

In last week's post, I talked about developing the One-Week Cartooning Workout, a free email course with tips, tricks, exercises, examples and resources, with James Sturm for The Center for Cartoon Studies.  In addition to those spot illustrations which branded the course, I also designed a series of animated GIFs which demonstrated exercises or helped illustrate some of the concepts.

Day One - Four Panel Comic

The idea here was that you could draw your four-panel comic one panel at a time in linear sequence, or you could start by drawing the first and fourth panels and then fill in the middle two panels afterwards.

Day Two - Character Design

The goal for this exercise is to create two characters who are visually unique, but also speak with their own unique voices.  Starting with two different shapes is a great way to end up with two different character silhouettes.

Day Three - Thrice-Told Tales

A rule of thumb that I use when I am hunting around for a story to draw as a comic, is if I've verbally told a story at least three times (to friends/family/coworkers, etc.) than it is probably pretty entertaining, and I've had a chance to revise it through each retelling.  The goal here was to convey that idea and then use one such story as a writing prompt.

Day Four - Notecard Comics

James Sturm often uses blank notecards as panel templates.  It's a great technique because it is easy to rearrange the moments, or throw one out if you get a better idea, etc.  The goal was to demonstrate this way of working.

Day Five - Twenty-Four Panel Page Layouts

After the students script out comic story using 24 note cards, they are then prompted to turn that into a comic.  This GIF shows how 24 panels can be split up into a variety of layouts, which will have different densities and page counts.  It would work as a static graphic, but having each layout appear gives the viewer a moment to consider the layout.

Day Six - Draw Comics EVERY Day

Any success I've achieved as a cartoonist can be traced back to my practice of Drawing Comics EVERY Day, even if it's only for 15 minutes a day.  Again, this would work as a static image, but having each check mark tick off gives a stronger sense of sequence and time moving forward.

Day Seven - Seeking Feedback

This GIF communicates the importance of sharing your work (whether in person or online) and seeking constructive feedback.

If these exercises and concepts sound interesting, you can sign up for the One-Week Cartooning Workout at any time and it is absolutely free.  It's full of tips and tricks and examples and resources to help you get the ball rolling with your cartooning - check it out!

December 4, 2015

Happy Holidays From Molly Weasley!

Okay, okay, I know I said I wasn't going to take on any more illustration work this year, but when my friends over at The Harry Potter Alliance asked me to draw a holiday eCard for them this year, I couldn't say no!  I ended up drawing one of the unused ideas that I had pitched them for last year's holiday card.  This concept was originally pitched for a printed card that would open, so it has two parts.

The first part is Molly Weasley, sitting comfortably in The Burrow, doing some knitting:


The second part shows the fruits of her labor, as displayed on the members of her family, and some of their friends:


Since this was going to be an eCard, however, we had to figure out how these two images would work together online.  Since this would all be digital, I thought it might be cool to post the first image as an animated .GIF file, instead of just a static image.

The first variant that I animated had a secret "Alohomora" message that appears in the bottom corner, allowing the user to "unlock" the image by clicking on it, thus revealing the second image.  I animated this by drawing six frames on paper and then bringing them into Photoshop.


This was the option that the HPA eventually chose.  You can see how it all came together (with music!) on their holiday fundraising page.

For the second variant that I animated, I got a bit carried away...  I thought, "Wouldn't it be cool if everything in the scene was animated?!"  Really, it was an excuse to experiment with Anime Studio, a 2D animation tool I recently bought to help me with another project.  I tried out a bunch of different techniques and came up with the crazy scene below.  (WARNING! Big file: 2.7 MB)


At the size the HPA was going to use this on their site, the file was actually 5 MB, so it was a no-go.  Still, I had a lot of fun building this, and I learned a bunch of new techniques which will serve me well in the future.  Since it's kind of small here, I thought I'd do some "zoom-ins" on each of the elements.

Here is the garden gnome that Fred and George put a tutu on, painted gold and tied to the top of the Christmas tree:


The snow falling outside the window of The Burrow was probably the most complicated aspect of this animation.  It was only a 4 second loop, so I couldn't get a whole double-window's worth of snow to fall through in that amount of time - too fast!  Instead I took a tiny loop of snow falling past a single window and duplicated it.  Because they are identical, it appears that the top window snow falls into the bottom window snow (if that makes sense).


I wish I had spent a bit more time on the knitting hand poses, but as it was, I had already spent too much time on this animation.  Instead of drawing them on paper, I drew them directly into Photoshop to save time.  It's a pretty clunky 6 frame loop.  If nothing else, at least the needles cross over in different directions each cycle!


It wouldn't be the holidays at the Weasley's without some Celestina Warbeck on the wizarding wireless!  For this one I utilized a visibility "fade in / fade out" preset that was built into Anime Studio.


I was very excited to have an excuse to design and draw Mrs. Weasley's family clock! I used some "ease in / ease out" tweening on the pendulum and then had Arthur and Charlie Weasley's hands snapping back and forth between "traveling" and "work."  Everyone else was either safely at home, or at Hogwarts!


The fire was super fun.  It's just a quick 4-frame loop that I drew directly in Photoshop.


For whatever reason, my favorite part of this whole piece is Errol, perched up on the mantelpiece.  I think this drawing of the Weasley family owl is very funny, and it was fun having him breathe very, subtly and slowly.   Every time I look at this it cracks me up!


Thanks again to the Harry Potter Alliance for giving me a chance to work on this.  Please donate to their great organization if you are able to!

November 8, 2014

L'employé du Moi Animation: Part 5

Okay, my animation for L'employe du Moi is done!  In my previous post I showed the final pencil test, so all that remained was to ink the pencils.  I did this with a Pilot Precise V7 "fine" ballpoint pen for outlines and an extra-fine Rotring Art Pen for crosshatching and details.  I had to spread the work out over a few nights to get it done without going crazy (inking the same thing over and over again).


Once that was done, I scanned everything in and started compositing all the pieces.  It took a bit of work to clean all of the intersecting points (like where Argus's hands hit the cart).  Anyway, here is the finished product, which is 2.9 MB.  It might take a few moments for it to load, depending on your connection:


Overall, I'm pretty happy with how this turned out.  There's a few things I would change if I had to do it over again, but for now I'm going to leave it as is.  I'm leaving this project with pretty much the same mindset I came in with: hand-drawn animation is a crazy amount of work for very little reward.  I have no desire to ever become an animator, but I'm glad I worked on this small project which taught we a ton of new stuff, which I'll definitely be able to bring back and apply to my comics work.  I'm very excited to get back to the world of static drawings and panels and page turns!

Before I sign off, I'll give you all one final reminder that L'employé du Moi is currently doing a fundraiser to have a 15th anniversary exhibit at next year's Angoulême festival.  Currently, they need less than 1,000 euros to push them over their goal, and 16 days to reach it.  It's all-or-nothing, so please consider chipping in if you can!  Thanks.

November 4, 2014

L'employé du Moi Animation: Part 4

In my last post I figured out the backgrounds, so it was time to finish up the character animation.  I did a few passes through the 16 frames of my character Argus (from Basewood) to fix some problems, namely:  1) I cleaned up his head shape 2) I toned down the counteraction in the dagger 3) I took out the blink and 4) I added details like his patches, and the straps on his boots.  Here is my final pencil test:


I can still see some things wrong with it, but at this point I'm going to chalk those up as "lessons learned" and keep moving forward.  This has been a fun little activity while I have been on break between issues of Phase 7, but I'm getting antsy to return to comics (where I belong).  I'm going to ink this up and then composite all the various parts.  I'll report back here with the final results!

In the meantime, check out another one of the L'employé du Moi walk cycles that has surfaced, this time by the incredible cartoonist/carpenter Bulu:


If you can't read the French (I can't...) it basically says that L'employé du Moi currently has a fundraiser so that these animations can be displayed at next year's Angoulemê comics festival in France, along with a bunch of other great stuff!  They've got about 2,000 more Euros to raise in the next 19 days, so every little bit helps!  If you are wondering, it is super simple to donate from the USA, the same as any other online transaction.  It took me about 5 minutes to chip in.  If you do so, thanks!  Or... Merci!  ;)

November 1, 2014

L'employé du Moi Animation: Part 3

After my last post, I took a break working on the character animation to work on the background for this animation.  I'm not even sure we're allowed to have backgrounds, but it's easy enough to export two versions (with and without the background) so I decided to use it as an opportunity to try out some new techniques... or at least techniques that were new to me!

I started off by setting up three looping frames of deep background, using some soft pencils and a layer of gray.  It's a pretty repetitive loop, but I felt it was okay because it'll have a lot of unique 16-frame animation on top of it.  Here's what that looks like on its own (1.4 MB animated .gif, might take a moment to load, depending on your connection speed!):


Next, I wanted it to be snowing in this little loop, so first I looked at some animated gifs of actual falling snow.  I noticed right off the bat that there is a little bit of parallax going on, so I decided to create my snow in two layers: 1) foreground snow, which moves very quickly (close up) and 2) background snow which moves a little slower (farther away).

The only way I could think of to do this was to mark out the picture plane and then make some "paths" that I could animate the snow down.  Here's what that template looks like:


The top box is for the background snow and the bottom box is for the foreground snow.  Along the top and right edge you can see various marks - this was me trying to stagger the entrance of the snowflakes.  In the top box, I tried to make a snowflake take 16 frames to go from top to bottom, in the bottom, it only takes 8 frames for a snowflake to go from top to bottom.  So in the top animation, once a snowflake was halfway down, I started another one on the same path.  In the bottom animation, I just had a new flake start as soon as the other one was done.  So with 19 paths in the top animation, with two passes on each, I did about 40 passes on 16 frames, or about 650 snowflakes.  11 paths on the bottom, getting approximately two snowflakes each (the shorter ends get more), on 16 frames that's about 350 snowflakes.  More than 1,000 total!  Enough stats, let's see how they move!  Here's the slower, background snowflakes:


At first, I had about half of the paths start in the same frame, so there is sort of a horizontal gap at one point, but I'm happy enough with this that I don't feel like I need to redo anything.  This was a crazy amount of work, but it really helped me wrap my head around the looping concept.  If a path had a snowflake introduced on frame 2 and 9 I would just reorganize the stack of paper so that loop started on the top.  Here's what the faster moving foreground snowflakes looked like:


The other thing I worked on by doing all of this manually was my sense of timing/spacing.  Just having to animate a dot moving along a path was a great exercise for this.  You can watch any one flake (easier to do with the background flakes), and it slows down slightly if it's moving horizontally (drawn closer together) and faster if it's falling down (drawn further apart).   

The final step was to composite all of these things together.  This isn't perfect, because these are just pencil tests, but at least you can see what I'm going for.  In the final, the foreground flakes will be white in their centers, with a black stroke around the flakes, whereas the background flakes will just be white dots (as they are here).  Again, this animated .gif is 1.4MB so it might take a little while to load, depending on your connection:


Now all I need to do is drop in Argus!  I still need to do one more round of cleanups on his pencils, which I'll post here before putting everything together in the final animation.

The L'employé du Moi fundraiser is currently about 75% of the way to meeting its goal!  If you are enjoying these posts, please consider donating a Euro or two.  They've got about three weeks left to raise the last 25% so that this animation can be displayed in L'employé do Moi's exhibit at Angoulemê next year, along with all the other animations by the rest of their authors.

October 19, 2014

L'employé du Moi Animation: Part 2

As I mentioned in my previous post, my French-language publisher, L'employé du Moi is currently raising funds for their 15th anniversary exhibit at next year's Angoulême International Comics Festival.  As part of that exhibit, each of their authors is working on a small animation based on their logo.

I was hanging out behind the table all day today with my wife Claire at the East Bay Mini Maker Faire, and I brought this project along with me.  I was able to tape my peg bar to a clip board.  I didn't have my lightbox, but I got on okay by just flipping really quickly between two drawings.  Here was my setup:


I was able to make it through all sixteen frames, cleaning up the rough animation.  There are still some problems with the legs, but at this point I think they are as good as they're gonna get.  I also tried to add some "counteraction," which I think was pretty successful in the tip of Argus's beard and his hood, but got pushed too far with his dagger.  I also added a blink which I'm gonna take back out. With a sequence this short (16 frames) it just happens too often.  I'm learning to "Keep It Simple, Stupid." Anyway, here it is:


I'm gonna blame the squishiness of Argus's head on the fact that I didn't have a lightbox.  I'll probably make one more pass to tighten that up a bit, and then also take out the blink, mellow out the dagger movement and add the final details. Then I'm going to ink it!

I took out all of the extra movement from the cart (swinging handle, bouncing carrots) and just inked four frames of this to loop on its own layer.  The jiggling you see is just natural human error in my hand, which I think looks cool.  I also moved the little lump of built-up snow in front of the sled to the ground layer (animated with Argus) so that it has a unique 16-frame pattern instead of looping every four frames, which I think would have been distracting.

I've probably already spent too much time on this thing, but I still have a lot more I want to do with it, so I'll continue posting as I work on it.  Onwards!

October 16, 2014

L'employé du Moi Animation: Part 1

Yikes, it's hard to believe I have not posted in this blog since April!  Ironically, I have been doing a ton of illustration work, I just haven't had time to post it.  Between my various teaching, comics, freelance and relationship obligations (ie having a big wedding celebration!) it was a busy Summer.  Fear not though, I'll do some posts at the end of the year (or early in the new year) to catch you readers up on all the stuff I have been working on.  In the meantime, I wanted to post about a side-project that I'm really excited about...

My french-language comics publisher, L'employé du Moi will be celebrating their 15-year anniversary at next year's Angoulême International Comics Festival.  If they can raise enough funds, they will have a big exhibit at the festival, showcasing some of the work they have published over the last 15 years, including two of my books!

As part of the exhibit, they are trying to get each of their authors to do a small animation loop of the L'employé du Moi logo, which looks like this:


The idea is to edit a bunch of these together and have them on display at the exhibit.  To aid us, they sent along a photoshop file that had a simple walk cycle template drawn into it.  Here's what it looks like, exported as an animated .gif:


There were blank layers built in so you could draw directly into the file, but I don't draw digitally, so I actually printed out all 16 of the frames.  Here was my set-up, using a $15 Plastic Lightfoot Ltd. Round Pegbar taped down to my lightbox, a bunch of copy paper punched with a standard 3-hole punch, a copy of The Animator's Survival Kit, an lead holder with some HB lead and an eraser:


My previous attempts at animation were all pretty rudimentary, so even this tiny project presents a huge leap in complexity for me.  Also I haven't done any of this stuff in about two years, so it felt like starting from scratch.  Initially I punched the holes in the bottom of the template drawings but after working for about two minutes I repunched them all across the top because I didn't like how it felt.  I was learning already! 

I started by tracing my first frame off of the template drawing.  Then, by constantly referencing the Richard Williams book, I was able to add a bit more up and down movement to the walk cycle and to try and get the feet right, which were a bit more detailed in my drawings than in the template drawings.  

I've got a bunch of projects going right now, so it took me about two nights to just rough in the 16 drawings of the character (I decided to use Argus from my graphic novel, Basewood).  Although this was a lot of work, I was having a ton of fun.  At one point I actually felt like I was getting into the flow of things, and I started being able to "see" the movement and what I wanted to do next.  Pretty exciting stuff!

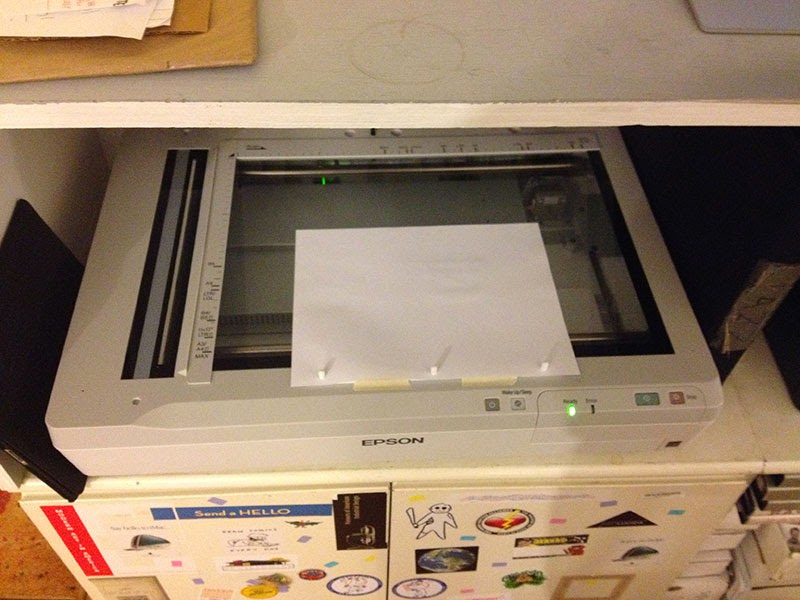
After the drawings were done, I took the plastic peg bar and taped it to the edge of my scanner (not on the glass).  Yes, I have a very nice scanner (thanks, James Patterson).  This was so much faster than setting up Claire's camera and taking photos like I did on my previous animations, and the results were much cleaner as well!


It also meant that all my scans would come into the system perfectly registered.  I just set the scanning software to grab a rectangle where all the action took place and then changed the file name for each drawing as they came in.  Here's what that looks like (click to see bigger):


Once I had all the files in the computer, I ran a quick Photoshop action to rotate them and to darken the line art a little.  Then I used this Script...  I can't remember if this comes with Photoshop, or if I had to install it at some point.  Anyway, it's under File > Scripts > Add Files To Stack... (click to see bigger):


That'll take you to a window like the one below, where you can point it to your folder full of files.  Make sure to name your files with an increasing numeral at the end! Mine were:A_00.jpg A_01.jpg A_02.jpg etc.


That'll create a Photoshop document where each drawing is in its own layer.  Then if you open Window > Timeline (or I think it was "Animation" on previous versions of Photoshop) you'll get a new timeline window.  In the top right there is a little dropdown menu where you can select "Make Frames From Layers":


That'll create one frame in the timeline for each layer.  Usually it brings them in backwards, so you can select "Reverse Frames" from that same menu to get them in the right order.  Once that's done, you have your little animation that you can play with!  Here's how mine turned out -- keep in mind this is just the rough layout!


I'm actually pretty happy with the walk cycle! I can see lots of stuff wrong with it, but for my first one ever, I feel pretty good about this.  I only drew the sled three times on separate sheets of paper, so that I could add it afterwards.  I wanted to have it bumping around a bit, but I'm still playing with it.  My first attempt had it vibrating, so for now I just have one bump in the middle.

Anyway, that's as much as I've done so far.  I'm excited to fix the animation a bit, and to start adding more details (his beard and clothes flapping around, etc.)  It's also been really fun to see some of the other L'employé du Moi artists do their animations.  People are already taking this simple concept in some unexpected directions!  

You can already see Max de Radiguès's animation (with a horse instead of a cart!) over on the L'employé du Moi Kiss Kiss Bank Bank campaign page. That's like a French Kickstarter, where they are trying to raise some money for the exhibit.  If you're able to, please chip in a few Euros!

I'll keep posting revisions of this animation as it gets more flushed out, and I'll try to share any other tips I pick up along the way.  I hope by posting some of my steps above, I'll encourage someone else to try out some hand drawn animation.  I'm also documenting all these steps so that when I attempt this again, two years from now, I'll remember how to do all this stuff!