Alec Illustration
Portfolio Books Coloring About Contact Blog

October 26, 2014

Weezer EWBAITE Pinball T-Shirt

Last week I had the good fortune to design a t-shirt for my all-time favorite band, Weezer.  Some photos of have started to surface of the shirt (already on sale!) so I thought I'd do a quick post about this design, which was one of the craziest illustration jobs I have ever done.

At this point I've drawn a few things for Weezer, plus I recently completed my Weezer Fan Trilogy of comic books, so a few weeks back Karl asked me to submit an idea for a Weezer T-Shirt.  The design needed to focus on their (AMAZING) new album, Everything Will Be Alright In The End because the EWBAITE tour was fast approaching!

For a few years now I have been putting out a pinball fanzine called Drop Target with my buddy Jon Chad.  In the middle of each issue we have a "Dream Machine" section where we draw the playfield for an imaginary pinball machine that we wish existed.  There is so much great imagery in EWBAITE, I thought it would be cool to represent all of the songs in a single pinball playfield.

On October 13th, I sent Karl a little PDF that laid out my sketch and explained the concept, so that he could show it to the band and their management or whoever makes these decisions.  If you can't tell, I  based the layout on the 1984 Williams game Space Shuttle (a secret nod to The Astronauts for any Weezer Fan Club members out there).  Here's the page where I laid out all the features (click all the images in this post to see them bigger):


I really wasn't sure if Weezer would go for this design.  For me, it's the intersection of so many cool things that I love, it almost makes my brain explode to look at it, but I knew I wasn't seeing it objectively.  I love Weezer and pinball way too much, so I just left it up to them to make the call.

On October 20th at 10:30am Karl emailed me to say that the sketch was approved but also that the design was being "fast tracked" and that he needed it "tonight" if that was humanly possible.  I told him I might be able to get it in before the printers got to work the next day, so we set a deadline of 8:00am the following morning.  I canceled everything I had planned for the rest of the day, and started drawing at 11am.


It ended up taking me 20 consecutive hours of drawing to finish the t-shirt and do all the production work.  It was pretty brutal, (and honestly I don't think I would have been able to do it if I didn't draw a 24-Hour Comic every year!) but I kept telling myself "This is the coolest thing I have ever drawn!!! For WEEZER!!!" so I gave it my all, and worked through the night.

The hardest part was the lower playfield, which showcases the last three tracks on the album, The Futurescope Trilogy, which are mostly instrumental.  Luckily, this Weezer Fan Club member named TJ McDonald did a 5,000 word analysis of those tracks, which really helped me figure out some visuals to use (thanks TJ!).  By 5pm I had the lower playfield penciled in.  By 10pm I had the whole playfield penciled and then by 3am I had it all inked.  If you look carefully at the process pictures above, you can see me sneaking more and more stuff into the playfield - deep references from lyrics, or the packaging of the album, or the teaser videos that led up to its release.  I tried to put as much cool stuff in there as possible, for my fellow Fan Club members.

From 3am-6am I worked on digitally coloring the playfield and then separating out all of the files for the t-shirt printer.  My idea was to use a brown shirt and then print white, orange and black ink on it (colors from the album cover).  I sent off the final, print-ready files at 7am on October 21st, an hour before the deadline, and then finally went to sleep!


Last night Weezer played their first concert of the EWBAITE tour in Philadelphia, on October 26th and they already had my shirts for sale - "fast track" indeed!  Here is a photo of the merch table, by another Fan Club member, Nick Lombardo - you can see my shirt in the upper right corner (also, the epic Luke Pearson Rebel Weezer Alliance poster front and center!):


This was obviously a dream job for me, and I'm pretty pumped to see this t-shirt in person at the Weezer show in San Francisco a week from today!

UPDATE: You can now buy my pinball T-shirt in the Weezer online store!

October 19, 2014

L'employé du Moi Animation: Part 2

As I mentioned in my previous post, my French-language publisher, L'employé du Moi is currently raising funds for their 15th anniversary exhibit at next year's Angoulême International Comics Festival.  As part of that exhibit, each of their authors is working on a small animation based on their logo.

I was hanging out behind the table all day today with my wife Claire at the East Bay Mini Maker Faire, and I brought this project along with me.  I was able to tape my peg bar to a clip board.  I didn't have my lightbox, but I got on okay by just flipping really quickly between two drawings.  Here was my setup:


I was able to make it through all sixteen frames, cleaning up the rough animation.  There are still some problems with the legs, but at this point I think they are as good as they're gonna get.  I also tried to add some "counteraction," which I think was pretty successful in the tip of Argus's beard and his hood, but got pushed too far with his dagger.  I also added a blink which I'm gonna take back out. With a sequence this short (16 frames) it just happens too often.  I'm learning to "Keep It Simple, Stupid." Anyway, here it is:


I'm gonna blame the squishiness of Argus's head on the fact that I didn't have a lightbox.  I'll probably make one more pass to tighten that up a bit, and then also take out the blink, mellow out the dagger movement and add the final details. Then I'm going to ink it!

I took out all of the extra movement from the cart (swinging handle, bouncing carrots) and just inked four frames of this to loop on its own layer.  The jiggling you see is just natural human error in my hand, which I think looks cool.  I also moved the little lump of built-up snow in front of the sled to the ground layer (animated with Argus) so that it has a unique 16-frame pattern instead of looping every four frames, which I think would have been distracting.

I've probably already spent too much time on this thing, but I still have a lot more I want to do with it, so I'll continue posting as I work on it.  Onwards!

October 16, 2014

L'employé du Moi Animation: Part 1

Yikes, it's hard to believe I have not posted in this blog since April!  Ironically, I have been doing a ton of illustration work, I just haven't had time to post it.  Between my various teaching, comics, freelance and relationship obligations (ie having a big wedding celebration!) it was a busy Summer.  Fear not though, I'll do some posts at the end of the year (or early in the new year) to catch you readers up on all the stuff I have been working on.  In the meantime, I wanted to post about a side-project that I'm really excited about...

My french-language comics publisher, L'employé du Moi will be celebrating their 15-year anniversary at next year's Angoulême International Comics Festival.  If they can raise enough funds, they will have a big exhibit at the festival, showcasing some of the work they have published over the last 15 years, including two of my books!

As part of the exhibit, they are trying to get each of their authors to do a small animation loop of the L'employé du Moi logo, which looks like this:


The idea is to edit a bunch of these together and have them on display at the exhibit.  To aid us, they sent along a photoshop file that had a simple walk cycle template drawn into it.  Here's what it looks like, exported as an animated .gif:


There were blank layers built in so you could draw directly into the file, but I don't draw digitally, so I actually printed out all 16 of the frames.  Here was my set-up, using a $15 Plastic Lightfoot Ltd. Round Pegbar taped down to my lightbox, a bunch of copy paper punched with a standard 3-hole punch, a copy of The Animator's Survival Kit, an lead holder with some HB lead and an eraser:


My previous attempts at animation were all pretty rudimentary, so even this tiny project presents a huge leap in complexity for me.  Also I haven't done any of this stuff in about two years, so it felt like starting from scratch.  Initially I punched the holes in the bottom of the template drawings but after working for about two minutes I repunched them all across the top because I didn't like how it felt.  I was learning already! 

I started by tracing my first frame off of the template drawing.  Then, by constantly referencing the Richard Williams book, I was able to add a bit more up and down movement to the walk cycle and to try and get the feet right, which were a bit more detailed in my drawings than in the template drawings.  

I've got a bunch of projects going right now, so it took me about two nights to just rough in the 16 drawings of the character (I decided to use Argus from my graphic novel, Basewood).  Although this was a lot of work, I was having a ton of fun.  At one point I actually felt like I was getting into the flow of things, and I started being able to "see" the movement and what I wanted to do next.  Pretty exciting stuff!

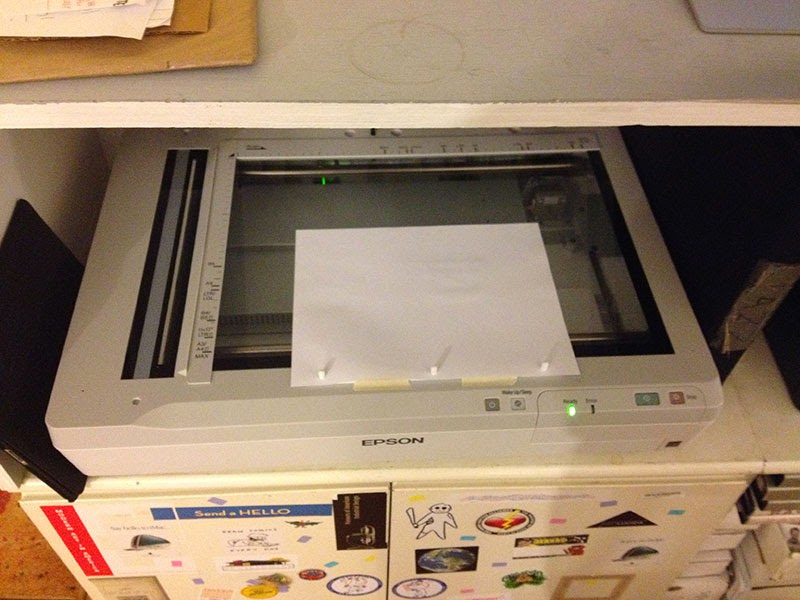
After the drawings were done, I took the plastic peg bar and taped it to the edge of my scanner (not on the glass).  Yes, I have a very nice scanner (thanks, James Patterson).  This was so much faster than setting up Claire's camera and taking photos like I did on my previous animations, and the results were much cleaner as well!


It also meant that all my scans would come into the system perfectly registered.  I just set the scanning software to grab a rectangle where all the action took place and then changed the file name for each drawing as they came in.  Here's what that looks like (click to see bigger):


Once I had all the files in the computer, I ran a quick Photoshop action to rotate them and to darken the line art a little.  Then I used this Script...  I can't remember if this comes with Photoshop, or if I had to install it at some point.  Anyway, it's under File > Scripts > Add Files To Stack... (click to see bigger):


That'll take you to a window like the one below, where you can point it to your folder full of files.  Make sure to name your files with an increasing numeral at the end! Mine were:A_00.jpg A_01.jpg A_02.jpg etc.


That'll create a Photoshop document where each drawing is in its own layer.  Then if you open Window > Timeline (or I think it was "Animation" on previous versions of Photoshop) you'll get a new timeline window.  In the top right there is a little dropdown menu where you can select "Make Frames From Layers":


That'll create one frame in the timeline for each layer.  Usually it brings them in backwards, so you can select "Reverse Frames" from that same menu to get them in the right order.  Once that's done, you have your little animation that you can play with!  Here's how mine turned out -- keep in mind this is just the rough layout!


I'm actually pretty happy with the walk cycle! I can see lots of stuff wrong with it, but for my first one ever, I feel pretty good about this.  I only drew the sled three times on separate sheets of paper, so that I could add it afterwards.  I wanted to have it bumping around a bit, but I'm still playing with it.  My first attempt had it vibrating, so for now I just have one bump in the middle.

Anyway, that's as much as I've done so far.  I'm excited to fix the animation a bit, and to start adding more details (his beard and clothes flapping around, etc.)  It's also been really fun to see some of the other L'employé du Moi artists do their animations.  People are already taking this simple concept in some unexpected directions!  

You can already see Max de Radiguès's animation (with a horse instead of a cart!) over on the L'employé du Moi Kiss Kiss Bank Bank campaign page. That's like a French Kickstarter, where they are trying to raise some money for the exhibit.  If you're able to, please chip in a few Euros!

I'll keep posting revisions of this animation as it gets more flushed out, and I'll try to share any other tips I pick up along the way.  I hope by posting some of my steps above, I'll encourage someone else to try out some hand drawn animation.  I'm also documenting all these steps so that when I attempt this again, two years from now, I'll remember how to do all this stuff!