My french-language comics publisher, L'employé du Moi will be celebrating their 15-year anniversary at next year's Angoulême International Comics Festival. If they can raise enough funds, they will have a big exhibit at the festival, showcasing some of the work they have published over the last 15 years, including two of my books!
As part of the exhibit, they are trying to get each of their authors to do a small animation loop of the L'employé du Moi logo, which looks like this:

The idea is to edit a bunch of these together and have them on display at the exhibit. To aid us, they sent along a photoshop file that had a simple walk cycle template drawn into it. Here's what it looks like, exported as an animated .gif:

There were blank layers built in so you could draw directly into the file, but I don't draw digitally, so I actually printed out all 16 of the frames. Here was my set-up, using a $15 Plastic Lightfoot Ltd. Round Pegbar taped down to my lightbox, a bunch of copy paper punched with a standard 3-hole punch, a copy of The Animator's Survival Kit, an lead holder with some HB lead and an eraser:

My previous attempts at animation were all pretty rudimentary, so even this tiny project presents a huge leap in complexity for me. Also I haven't done any of this stuff in about two years, so it felt like starting from scratch. Initially I punched the holes in the bottom of the template drawings but after working for about two minutes I repunched them all across the top because I didn't like how it felt. I was learning already!
I started by tracing my first frame off of the template drawing. Then, by constantly referencing the Richard Williams book, I was able to add a bit more up and down movement to the walk cycle and to try and get the feet right, which were a bit more detailed in my drawings than in the template drawings.
I've got a bunch of projects going right now, so it took me about two nights to just rough in the 16 drawings of the character (I decided to use Argus from my graphic novel, Basewood). Although this was a lot of work, I was having a ton of fun. At one point I actually felt like I was getting into the flow of things, and I started being able to "see" the movement and what I wanted to do next. Pretty exciting stuff!
After the drawings were done, I took the plastic peg bar and taped it to the edge of my scanner (not on the glass). Yes, I have a very nice scanner (thanks, James Patterson). This was so much faster than setting up Claire's camera and taking photos like I did on my previous animations, and the results were much cleaner as well!
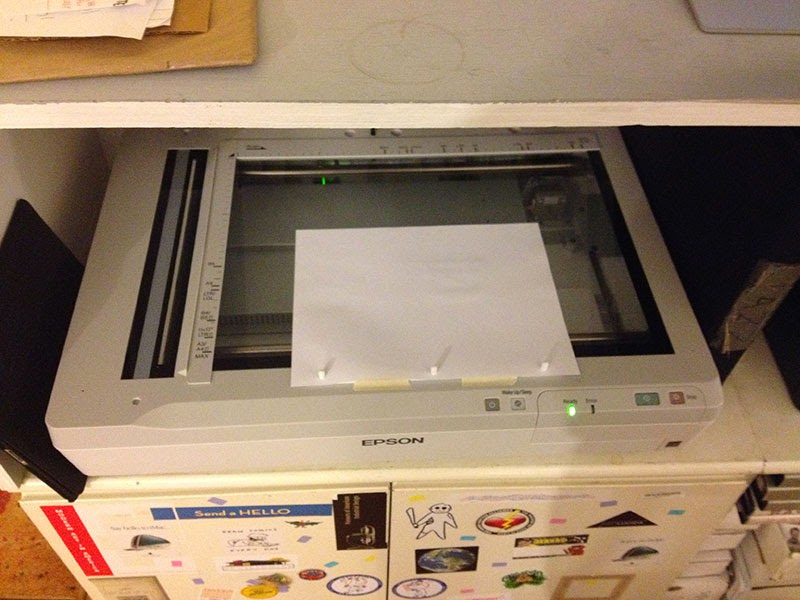
It also meant that all my scans would come into the system perfectly registered. I just set the scanning software to grab a rectangle where all the action took place and then changed the file name for each drawing as they came in. Here's what that looks like (click to see bigger):

Once I had all the files in the computer, I ran a quick Photoshop action to rotate them and to darken the line art a little. Then I used this Script... I can't remember if this comes with Photoshop, or if I had to install it at some point. Anyway, it's under File > Scripts > Add Files To Stack... (click to see bigger):

That'll take you to a window like the one below, where you can point it to your folder full of files. Make sure to name your files with an increasing numeral at the end! Mine were:A_00.jpg A_01.jpg A_02.jpg etc.

That'll create a Photoshop document where each drawing is in its own layer. Then if you open Window > Timeline (or I think it was "Animation" on previous versions of Photoshop) you'll get a new timeline window. In the top right there is a little dropdown menu where you can select "Make Frames From Layers":

That'll create one frame in the timeline for each layer. Usually it brings them in backwards, so you can select "Reverse Frames" from that same menu to get them in the right order. Once that's done, you have your little animation that you can play with! Here's how mine turned out -- keep in mind this is just the rough layout!

I'm actually pretty happy with the walk cycle! I can see lots of stuff wrong with it, but for my first one ever, I feel pretty good about this. I only drew the sled three times on separate sheets of paper, so that I could add it afterwards. I wanted to have it bumping around a bit, but I'm still playing with it. My first attempt had it vibrating, so for now I just have one bump in the middle.
Anyway, that's as much as I've done so far. I'm excited to fix the animation a bit, and to start adding more details (his beard and clothes flapping around, etc.) It's also been really fun to see some of the other L'employé du Moi artists do their animations. People are already taking this simple concept in some unexpected directions!
You can already see Max de Radiguès's animation (with a horse instead of a cart!) over on the L'employé du Moi Kiss Kiss Bank Bank campaign page. That's like a French Kickstarter, where they are trying to raise some money for the exhibit. If you're able to, please chip in a few Euros!
I'll keep posting revisions of this animation as it gets more flushed out, and I'll try to share any other tips I pick up along the way. I hope by posting some of my steps above, I'll encourage someone else to try out some hand drawn animation. I'm also documenting all these steps so that when I attempt this again, two years from now, I'll remember how to do all this stuff!
No comments:
Post a Comment